Anyone that utilizes shear wrenches for installing tension control (TC) bolts knows that these wrenches lack a reverse function. A nut buster, also known as a reverse sleeve or socket, is used in conjunction with a shear wrench for a quick and easy bolt removal operation. Since the insertion end of a nut buster mimics the spline of a TC bolt and nut, the attachment is able to sit comfortably inside the socket of the shear wrench. Once installed, press the trigger of the shear wrench and let the nut buster do all the work. This method ensures a smoother, safer removal process, minimizing downtime and preventing unnecessary tool wear, breakage or worker injury. In this guide, we’ll walk through how a nut buster works and the best techniques for getting the job done right.

Applications for TC Bolt Removal
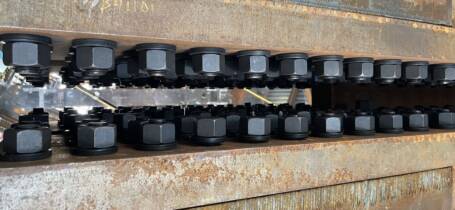
The precise reverse thread design of the nut buster ensures unmatched efficiency and reliability during the removal process. While smaller bolt diameters can be removed manually, larger bolts can require some serious muscle. The nut buster is ideal for maintaining performance in high-pressure and high-load applications such as after performing a rotational capacity (ROCAP) or pre-installation verification (PIV) test using a bolt tension measuring device or calibrator.
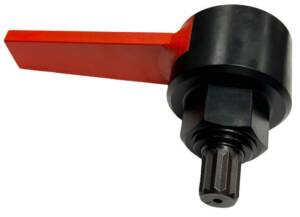
Equipped with a reaction member, the nut buster absorbs the installation torque instead of the worker for increased safety and stability. Its portable and versatile design makes it a suitable solution that won’t damage surrounding bolts or equipment and is available for 3/4″, 7/8″, 1″, and 1-1/8″ bolt diameters.
Using a Nut Buster: Step-by-Step Guide
Follow these steps for safe and efficient operation:
Step 1: Prepare the Wrench and Nut Buster
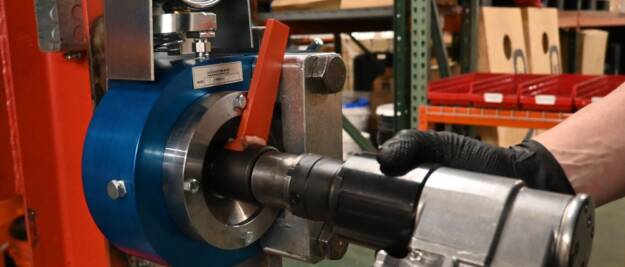
Ensure you have a compatible nut buster for the TC bolt being removed. Insert the nut buster into the wrench socket, no additional securing necessary.
Step 2: Position the Wrench on the Bolt
Align the wrench with the nut buster to the installed TC bolt needed to be removed. There should be no risk of slippage, since the nut buster matches the bolt diameter.
Step 3: Activate the Reverse Threads
Hold the wrench firmly and press the trigger to engage reverse rotation. The nut buster will enable the tool to spin the nut counterclockwise, loosening it from the connection.
Step 4: Remove the Nut Completely
Continue holding the trigger until the nut is fully extracted or can be removed by hand. If the nut is particularly tight, apply steady pressure rather than sudden force to avoid damage.
Step 5: Inspect and Store Tools
Ensure the nut buster and shear wrench are clean and free of debris and store them properly for future use (see last section).
Nut Extraction Safety Considerations
When using a nut buster with a shear wrench, safety should always come first. Follow these precautions to prevent injuries and ensure smooth operation:
- Wear proper PPE: Always use gloves to protect your hands from sharp edges and high heat generated during bolt removal. Safety glasses are essential to shield your eyes from debris. Additional PPE, such as steel-toe boots and long sleeves, may be necessary depending on the job site.
- Avoid the reaction member (red arm): The reaction member absorbs torque during operation, making it a potential pinch point. Never place your hands near or on this component while using the wrench, as serious injuries can occur.
- Maintain a secure grip: Ensure the wrench is properly aligned with the nut and held securely before activating the reverse function to prevent slippage or sudden movement.
- Know when to call an expert: If the nut won’t budge, forcing it may lead to tool damage or broken hardware. When dealing with nuts that require specialized equipment or additional torque, contact an expert for advice and tool recommendations.
By following these safety guidelines, you can confidently use a reverse sleeve while minimizing risks to both yourself and your equipment.
Maintenance Tips for Nut Busters
One of the best things about nut busters is that they require no maintenance beyond basic cleaning and proper storage. However, taking care of your equipment ensures longevity and reliability, so be sure to follow these simple guidelines:
- Always clean after use: Wipe down the nut buster after each use to remove dirt, dust and grease. Avoid harsh chemicals that could damage the material; a mild solvent or degreaser works best.
- Store in a dry place: Moisture can lead to corrosion over time. Keep your nut buster in a climate-controlled environment when not in use.
- Use protective cases: If possible, store nut busters in a designated case or toolbox to prevent unnecessary wear.
- Avoid stacking: Stacking heavy tools on top of each other can cause warping or damage. Keep your nut buster separate from heavier equipment.
While nut busters and other structural bolting tools are built for maximum durability, it’s better to be safe than sorry. This way, you’ll keep your nut buster in top condition, ready for the next job with no downtime.
Investing in high-quality tools ensures the job gets done right the first time. Whether you need to buy or rent, GWY offers industry-leading bolting tools, expert advice and top-tier customer support to help you tackle any challenge. Contact GWY today to find the right solution for your bolting needs!